How To Replace A Kitchen Sink Sprayer Hose That Is Leaking?
A leaking kitchen sink sprayer hose is one of those household problems that seems small at first but can quickly turn into a frustrating and costly issue. In the United States, many homeowners rely on kitchen sinks with pull-out or side sprayers for everyday tasks like rinsing dishes, washing vegetables, or cleaning large pots and pans. When the sprayer hose starts leaking, it not only wastes water but can also damage cabinetry, countertops, and flooring if left untreated. Knowing how to address this problem promptly is essential for maintaining a functional and efficient kitchen. Understanding the mechanics of a kitchen sink sprayer hose can help homeowners and renters alike save time, money, and unnecessary plumbing calls.
These hoses, which are typically flexible and retractable, connect the sprayer head to the water supply underneath the sink. Over time, normal wear and tear, mineral buildup, or improper installation can lead to leaks. Repairing or replacing a sprayer hose is a practical DIY project that many American households can tackle with minimal tools. Not only does it restore the sink’s functionality, but it also reduces water bills and prevents long-term damage. For U.S. users, knowing the correct parts to purchase, such as universal hoses or manufacturer-specific replacements, can make the process smoother and more cost-effective. This guide will walk you through each step, from understanding your hose type to identifying leaks, purchasing the right replacement, and safely installing it.
We’ll also cover preventive tips to extend the life of your kitchen sprayer. Whether you’re a first-time DIYer or an experienced homeowner, these instructions are designed to make the process clear, manageable, and efficient. By the end of this article, readers will have a complete understanding of why sprayer hoses leak, the tools and materials required for a replacement, and the step-by-step process to fix the issue. You’ll also gain insight into maintenance practices that keep your kitchen plumbing in top shape. Sprayer hose replacement is not just about fixing leaks; it’s about improving kitchen efficiency and preventing small problems from escalating into major home repairs. This knowledge is particularly relevant in the United States, where older homes may have outdated plumbing and many families prioritize energy and water conservation. Throughout the following sections,
we’ll provide practical examples, such as common U.S. sink brands, typical household water pressures, and DIY-friendly approaches used by American homeowners. You’ll learn how to troubleshoot issues, choose between OEM and universal parts, and understand the potential challenges before starting the project. By understanding the anatomy of your kitchen sink sprayer hose and the proper replacement techniques, you can regain full control of your kitchen workflow. This guide emphasizes hands-on, real-world solutions that work within the context of U.S. homes and plumbing standards. Ultimately, this knowledge empowers homeowners to handle minor plumbing repairs themselves, saving both time and money. It also promotes confidence in tackling future kitchen maintenance tasks, reinforcing the value of self-reliance and practical home skills.
Addressing a leaking sprayer hose promptly helps protect your kitchen investments, prevents water waste, and contributes to a more sustainable home environment. It also avoids the inconvenience of continuous drips or potential mold growth caused by prolonged moisture. In addition, learning this skill aligns with the growing trend in the United States of DIY home improvement, where homeowners prefer hands-on solutions over calling a plumber for minor issues. This approach fosters a sense of accomplishment and ensures long-term reliability of home fixtures. We’ll also explore common mistakes, such as overtightening connections, using incompatible hoses, or neglecting to inspect washers and fittings. Understanding these pitfalls will prevent repeated leaks and costly replacements. From selecting the correct tools to testing the hose after installation, every step will be detailed and explained in plain English, making it accessible to all readers regardless of prior plumbing experience.
This guide also emphasizes safety, such as turning off the water supply and avoiding damage to other plumbing components during replacement. Safety considerations are critical to prevent accidents or property damage during DIY plumbing projects. By following the instructions in this article, U.S. homeowners can achieve professional-quality results without paying for labor-intensive services. You’ll gain practical skills, reduce home maintenance costs, and extend the life of your kitchen sink sprayer. Finally, the knowledge shared here goes beyond a single repair. Understanding sprayer hoses, their components, and maintenance strategies contributes to overall home efficiency, better water management, and long-term satisfaction with your kitchen setup.
How To Replace A Kitchen Sink Sprayer Hose That Is Leaking?
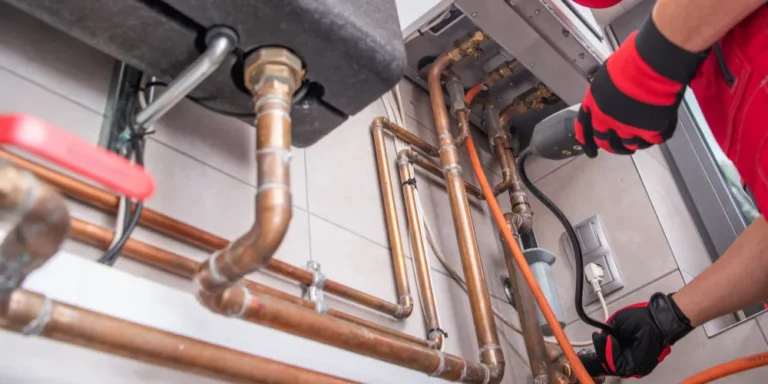
A kitchen sink sprayer hose connects the sprayer nozzle to the water supply and allows flexible water delivery for rinsing and cleaning. Over time, these hoses can develop leaks due to wear, cracks, or loose fittings. Replacing a leaking hose is crucial for preventing water damage, reducing waste, and restoring sink functionality. In the United States, where many households rely on pull-out or side sprayer sinks, knowing how to replace the hose ensures efficiency and saves money on plumbing services.
1. Identifying the Type of Sprayer Hose
Before attempting replacement, it’s important to identify the hose type. Common U.S. kitchen sink sprayer hoses include pull-out, pull-down, and side sprayer models. Pull-out hoses extend straight from the faucet, pull-down hoses drop from a high arc spout, and side sprayers sit separately next to the sink basin. Understanding your hose type helps you purchase the correct replacement. Many American brands, like Moen, Delta, and Kohler, offer specific models, so matching the hose to the faucet ensures compatibility. Inspect the hose for visible wear, kinks, or mineral buildup. This evaluation also allows you to determine if the problem is limited to the hose or if fittings and washers need replacement.
2. Gathering Tools and Materials
A successful replacement requires preparation. Common tools include an adjustable wrench, pliers, a bucket to catch water, and a towel to protect cabinets. Replacement hoses can be universal or brand-specific. In the U.S., hardware stores like Home Depot, Lowe’s, and Ace Hardware carry both options. Universal hoses may save money but require checking for proper length and connector size. Having the right tools and materials ensures a smooth, safe replacement process without the need for emergency plumbing calls.
3. Shutting Off the Water Supply
Safety is crucial. Turn off both hot and cold water valves under the sink before starting. Open the faucet to relieve residual pressure. This prevents water sprays or flooding during hose removal. In U.S. homes, shut-off valves are typically located beneath the sink and are easy to identify. If valves are old or stuck, use caution to avoid damage. Ensuring the water supply is completely off protects you and your kitchen from potential water damage during the replacement process.
4. Removing the Old Hose
Start by disconnecting the hose from the faucet and the sprayer head. Loosen the nuts with an adjustable wrench, taking care not to scratch surfaces. Remove any retaining clips or washers. If the hose is stuck due to mineral buildup, gently twist or apply a vinegar solution to loosen it. Pull the hose out slowly to avoid tangling. In U.S. kitchens, hoses often loop around under the sink, so carefully noting the routing helps with smooth installation of the new hose.
5. Inspecting Fittings and Connections
After removing the old hose, inspect faucet fittings, washers, and connections for damage. Replace worn washers or O-rings, as these are common causes of leaks. Many American households overlook these small components, which leads to repeated leaks if not addressed. Cleaning threads and applying plumber’s tape ensures a tight seal. Proper inspection prevents issues that could compromise the new hose’s performance.
6. Choosing the Right Replacement Hose
Select a hose that matches the length, diameter, and connector type of the original. U.S. brands often provide exact replacement parts, which simplifies installation. For older or custom sinks, universal hoses may work but double-check compatibility. Consider the material; braided stainless steel hoses tend to last longer than plastic ones. Choosing the right hose reduces installation errors, ensures durability, and prevents future leaks.
7. Installing the New Hose
Route the new hose the same way the old one was positioned. Attach it to the sprayer head and faucet, tightening connections securely but avoiding over-tightening. Ensure the hose can retract or extend smoothly without kinking. Step-by-step installation includes inserting washers, aligning threads, and checking that all connections match manufacturer specifications. Proper installation ensures optimal water flow and prevents leaks in American homes.
8. Testing for Leaks
After installation, turn the water supply back on slowly. Check for leaks at all connections, including the faucet, sprayer head, and under-sink fittings. Run water through the sprayer and observe the hose’s movement. Address minor drips immediately by tightening fittings. Testing ensures functionality and prevents damage from undetected leaks. In U.S. households, this step is crucial, as plumbing codes and standards prioritize water conservation and safety.
9. Maintenance Tips to Prevent Future Leaks
Regular maintenance prolongs hose life. Avoid harsh chemicals that degrade the material, clean aerators to prevent pressure buildup, and periodically inspect washers. Keeping the hose free from kinks and twists ensures smooth operation. Many U.S. homeowners also benefit from installing water softeners to reduce mineral buildup. Consistent maintenance reduces repair frequency and protects both the hose and the surrounding kitchen fixtures.
10. When to Call a Professional
Some situations require professional help. If the leak persists after replacement, the faucet is old, or multiple components are corroded, contacting a licensed plumber is recommended. U.S. plumbing standards require certain fixtures to meet safety and building codes, especially in rental properties or older homes. Knowing when to DIY and when to hire a professional ensures safety, prevents costly damage, and guarantees long-term reliability of your kitchen sink system.
Conclusion
Replacing a leaking kitchen sink sprayer hose is an essential skill for U.S. homeowners who want to maintain a functional, efficient, and water-conscious kitchen. By understanding hose types, identifying problems, and following step-by-step replacement instructions, you can save both time and money while preventing water damage. Proper inspection of fittings, careful installation, and testing for leaks are critical to achieving a long-lasting repair. Equally important is regular maintenance, such as checking washers, avoiding kinks, and cleaning components to extend hose life. Following these practices reduces the frequency of repairs and promotes a reliable kitchen setup. Choosing the right replacement hose, whether universal or brand-specific, ensures compatibility and optimal performance. DIY replacement empowers homeowners, providing confidence in handling common plumbing issues and aligning with the growing American trend of hands-on home improvement.
Understanding the limits of DIY is equally crucial—knowing when to call a professional safeguards property and adheres to U.S. plumbing standards. Addressing leaks promptly not only conserves water but also protects cabinets, flooring, and countertops from damage. It prevents small issues from escalating into costly repairs and helps maintain the overall efficiency and cleanliness of the kitchen. In U.S. households, where kitchens serve as central hubs of daily activity, a functioning sprayer hose enhances convenience, speeds up cleaning tasks, and improves overall workflow. It supports sustainable water use and reduces the stress of dealing with constant drips or malfunctioning fixtures. By following the guidelines in this article, readers gain practical skills, understand preventive measures, and learn to troubleshoot minor issues before they become major problems. This knowledge fosters independence, ensures high-quality results, and contributes to a well-maintained home. Ultimately, a leaking sprayer hose doesn’t have to disrupt your kitchen. With proper replacement techniques, attention to detail, and proactive maintenance, you can enjoy a fully functional, efficient, and reliable sink for years to come.
Investing a little time and effort in replacing the hose today prevents significant expenses tomorrow. It’s a practical, manageable, and highly beneficial project that every U.S. homeowner can confidently undertake. A well-maintained kitchen sink sprayer hose represents more than just plumbing—it reflects care, efficiency, and commitment to a functional home. By following these steps, you ensure that your kitchen continues to meet your family’s needs seamlessly. Replacing a sprayer hose is not just a repair—it’s an opportunity to enhance your kitchen’s performance, reduce water waste, and enjoy the satisfaction of a well-executed home improvement task. With the knowledge shared here, U.S. readers are equipped to address leaks effectively, prevent future problems, and maintain a dependable kitchen environment. Proper planning, careful execution, and regular maintenance are the keys to long-term success.