How Can I Design a Compact Kitchen Island for Breakfast and Prep?
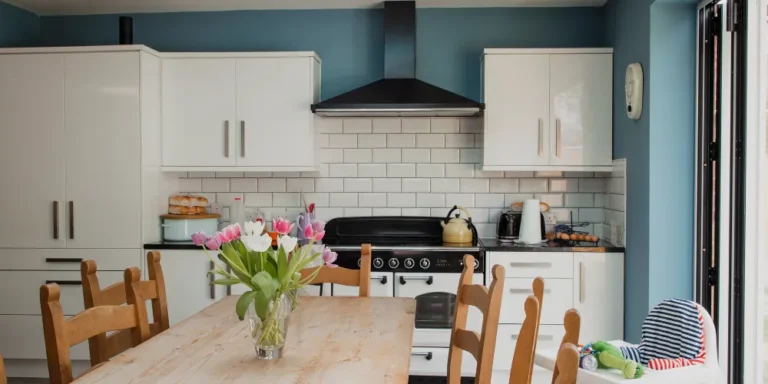
A kitchen island is one of the most functional and versatile features in a modern home. In compact kitchens, a well-designed island can serve multiple purposes, including meal preparation, dining, storage, and socializing. For homeowners across the USA, creating a compact kitchen island that accommodates both breakfast and prep tasks is an efficient way to maximize space. Small kitchens often face challenges like limited floor area and insufficient counter space, but a thoughtfully designed island can solve these problems. It can act as a central workspace while providing seating for quick meals or casual dining.
Proper planning ensures the island does not obstruct movement or kitchen workflow. Materials, finishes, and storage solutions should be chosen to enhance usability and aesthetic appeal. Incorporating appliances, sinks, or cooktops into the island adds functionality without cluttering other counters. Compact islands can also include cabinets, drawers, or open shelving to store utensils, cookware, and pantry items. Design considerations include height, width, seating arrangement, and circulation space around the island.
A flexible design allows the island to adapt to different activities and family needs. Lighting, power outlets, and countertop material are also important factors for practicality and style. This guide explores how to design a compact kitchen island that works efficiently for both breakfast and prep tasks, providing detailed tips, examples, and step-by-step advice for USA homeowners.
How Can I Design a Compact Kitchen Island for Breakfast and Prep?
Designing a compact kitchen island requires balancing space, functionality, and style. The island should serve as both a preparation area and a casual dining spot. Consider workflow, storage, and seating while maximizing counter space. Below are ten essential considerations for designing a small but highly functional kitchen island.
1. Measure Your Space Carefully
Before designing an island, measure your kitchen accurately. Consider the length, width, and circulation space needed around the island. Many USA homeowners leave at least 36–42 inches of clearance on all sides for comfortable movement. Accurate measurements prevent the island from feeling cramped or obstructing traffic flow. Include adjacent cabinets, appliances, and entryways in your measurements. Check ceiling height if considering lighting or hanging fixtures above the island. Measuring ensures the island fits seamlessly into your kitchen layout. Proper planning avoids costly modifications later. Take note of plumbing, electrical, and gas lines if you plan to add appliances. Consider any corners or irregular walls that may impact the island size. Record all dimensions clearly before proceeding to the design phase. Proper measurement is the foundation for a functional and compact kitchen island.
2. Determine the Island’s Primary Function
Decide whether the island will focus on meal prep, breakfast seating, or a combination of both. Many USA homeowners design multi-functional islands to serve both purposes. A prep-focused island may include more countertop space and storage, while a breakfast island emphasizes seating comfort. Clarifying the primary function guides the selection of countertop materials, dimensions, and layout. Multi-purpose islands require careful planning to prevent crowding. The island’s purpose influences the placement of appliances, sinks, and outlets. Understanding the main function ensures the island meets your family’s daily needs. It also helps define seating arrangements and countertop shape. Prioritizing tasks ensures workflow efficiency. Function-driven design avoids clutter and maximizes usability. Knowing the island’s purpose determines storage needs and accessory placement. This step forms the basis for every subsequent design decision.
3. Choose the Right Size and Shape
Select dimensions and shapes that fit the kitchen’s layout while leaving enough space for movement. Rectangular islands are common and fit well in narrow kitchens. Square or L-shaped islands can work in corners or open areas. Many USA homeowners opt for islands between 4–6 feet long and 2–3 feet wide in compact kitchens. Include seating space if planning a breakfast bar. Ensure the island does not block cabinet doors, drawers, or appliance access. Adjustable or movable islands provide flexibility in very small kitchens. Shape impacts workflow, seating capacity, and prep area. Proper sizing ensures both functionality and comfort. Compact islands can include overhangs for stools without sacrificing prep space. Avoid oversizing to prevent congestion. Dimensions should balance seating, storage, and countertop workspace. Correct sizing enhances efficiency and usability for daily tasks.
4. Select Durable Countertop Materials
The countertop must handle meal prep, hot pots, and casual dining. Popular options include quartz, granite, butcher block, and laminate. Quartz and granite are durable and low-maintenance, ideal for heavy prep work. Butcher block adds warmth and works well for chopping and food prep. Laminate is budget-friendly but may require careful handling. Many USA homeowners choose materials that complement existing counters and cabinetry. Consider stain resistance, scratch resistance, and ease of cleaning. Countertop thickness affects seating comfort and aesthetics. Rounded edges improve safety in compact spaces. Choose materials that match your kitchen style while withstanding daily use. Proper selection ensures longevity and ease of maintenance. Durable surfaces make the island a reliable workspace and dining area. Countertop finish should resist moisture and heat. A practical countertop supports both breakfast and prep needs efficiently.
5. Include Efficient Storage Solutions
Maximize storage in a compact island with cabinets, drawers, or open shelving. Store frequently used items like utensils, pots, pans, or cutting boards. Many USA homeowners use pull-out drawers, deep cabinets, or built-in organizers to save space. Vertical storage or tiered shelves can increase capacity without expanding footprint. Consider storage for breakfast essentials such as cereal, bowls, and coffee supplies. Hidden storage behind cabinet doors keeps the island tidy. Organize by task to simplify meal prep and cleanup. Efficient storage prevents countertop clutter and maximizes workflow. Adjustable shelving adds flexibility for taller items. Storage integration ensures the island supports both preparation and dining. Well-planned storage enhances kitchen functionality. Include accessible drawers for seating areas to provide convenient breakfast storage. Proper storage improves efficiency and keeps the kitchen organized.
6. Design Comfortable Seating
If the island serves as a breakfast spot, plan for seating overhangs and stool placement. Many USA homeowners allow 12–15 inches of overhang per seat. Bar stools or counter-height chairs should fit comfortably without obstructing circulation. Ensure space between seats for legroom and movement. Consider backless stools for compact areas or chairs with low backs. The number of seats depends on island size and kitchen layout. Adjustable-height stools add versatility for prep and dining. Seating placement should not interfere with cabinet doors or prep space. Comfortable seating encourages daily use for meals, homework, or casual gatherings. Include enough knee clearance and workspace under overhangs. Design seating to integrate seamlessly with the island design. Proper planning avoids cramped or awkward arrangements. Comfortable seating improves functionality and usability of the compact island.
7. Plan Electrical Outlets
Add electrical outlets to support small appliances, chargers, or lighting. Many USA homeowners install outlets on the side or end panels of islands for convenience. Consider USB ports for charging devices during breakfast or work. Outlets prevent cords from running across counters or floors. Placement should avoid interfering with seating or prep areas. Ensure outlets meet local building codes and are GFCI-protected if near water sources. Plan for hidden or recessed outlets to maintain aesthetics. Proper outlet placement allows for flexible use of appliances like blenders, coffee makers, or mixers. Electrical planning improves functionality and safety. Integrated outlets reduce clutter and enhance usability. Strategically placed outlets ensure the island can serve as both prep space and breakfast station. Power accessibility is essential for modern kitchen convenience.
8. Optimize Lighting
Good lighting is essential for meal prep and casual dining. Combine overhead fixtures, pendant lights, and under-cabinet lighting for layered illumination. Many USA homeowners use adjustable pendant lights over breakfast areas. Task lighting improves visibility for chopping, mixing, and cooking. Ambient lighting enhances comfort for dining and socializing. Proper lighting placement prevents shadows on work surfaces. Dimmer switches allow for mood control during meals. Light fixtures should complement kitchen décor while being functional. Consider energy-efficient LED bulbs to reduce electricity costs. Properly lit islands improve safety, aesthetics, and daily usability. Lighting design should highlight countertop space and seating areas. Well-planned lighting enhances both functionality and style. Lighting is key to creating a welcoming and efficient compact kitchen island.
9. Incorporate Multi-Functional Features
Include features like cutting boards, pull-out trays, or integrated trash bins. Many USA homeowners add prep sinks, small appliances, or wine racks in compact islands. Multi-functional design maximizes efficiency in limited space. Consider adding a small prep sink if plumbing allows. Pull-out cutting boards or extra counter surfaces provide flexibility. Integrated storage or trays can double as serving areas for breakfast. Multi-functional islands support cooking, dining, and entertaining without requiring extra counters. Design features should be accessible and easy to clean. Proper planning ensures all tasks can be performed efficiently. Multi-functionality enhances the value and practicality of the kitchen. Consider adding hooks or magnetic strips for utensils. Each element should support both prep work and casual dining. A well-designed multi-functional island reduces clutter and enhances usability.
10. Maintain Workflow and Circulation
Ensure the island does not disrupt the kitchen work triangle between sink, stove, and refrigerator. Many USA homeowners leave 36–42 inches of circulation space around the island. Avoid placing the island in a way that blocks doors, cabinets, or appliances. Proper circulation allows multiple people to work or eat comfortably. Consider sliding or movable islands in very small kitchens for flexibility. Maintain clear pathways for safe movement during meal prep and breakfast. Workflow planning ensures efficiency, reduces accidents, and makes the kitchen feel spacious. Proper circulation complements seating, storage, and prep space. A well-positioned island integrates seamlessly into the kitchen layout. Workflow and movement are critical for a functional compact kitchen island. Planning circulation enhances usability for cooking, cleaning, and dining. Efficient layout ensures the island improves rather than constrains kitchen functionality.
Conclusion
Designing a compact kitchen island for both breakfast and prep requires careful planning, space optimization, and functional design. Measuring your space, selecting the right size and shape, and defining the island’s primary function are the first steps. Durable countertops, efficient storage, and comfortable seating enhance usability and daily convenience. Adding electrical outlets, layered lighting, and multi-functional features improves practicality and flexibility.Maintaining circulation and workflow ensures a safe and efficient kitchen environment. A well- designed compact island maximizes limited space while supporting meal prep, dining, and socializing. Thoughtful design allows the island to serve as a central hub for cooking, eating, and family interaction. Quality materials and careful planning improve durability and long-term satisfaction. Compact islands blend style and functionality, complementing the overall kitchen design. Integrating storage, seating, and prep space ensures the island meets daily needs efficiently. Workflow considerations prevent congestion and make the space comfortable for multiple users. Multi-functional design allows the island to adapt to changing family activities. Proper lighting and electrical planning enhance usability and convenience. Comfortable seating makes casual dining or quick breakfasts enjoyable. Durable, easy-to-clean materials support both prep and dining functions. By following these steps, USA homeowners can create a compact kitchen island that balances efficiency, comfort, and aesthetic appeal. A thoughtfully designed island transforms a small kitchen into a versatile, functional, and inviting space for everyday life.